I plan on running the layout on a 2 Amp system with 2 (or 3) control boards with each board having 1 power pack and 1 Oz controller and associated switches. Prices for controllers range from $60 to $200 each and for power packs anywhere from $60 to $500 each. This is looking like an expensive venture not to mention the wiring however the below link shows you how to make your own controller and the products required listed in the Australian market. Please note I have no ownership of the below link and take no credit for the link as it's simply here as reference for my future self. I would like to thank John Rumming (author) for making this and allowing access to the link free over the web.
http://home.iprimus.com.au/nuggles58/Making%20A%20Basic%20DC%20Controller.pdf
http://home.iprimus.com.au/nuggles58/Making%20A%20Basic%20DC%20Controller.pdf
| So now wiring of the layout. I have gone with the design below. Keen eyed people will notice that I have changed the crossover in the platform at Station 1. I've been wrestling with this for a while and will probably continue to change this section around until it's in the construction phase. It has also been suggested to change the diamond at Station 1 to a single or double slip to allow for greater flexibility. I am not yet sure how I will overcome this issue, however I do like the inflexibility of this, and that, prototypically, the slips have a speed restriction on them. I do not wish to hinder the yard with a speed restriction at the mouth for departing traffic, however entering traffic will need to slow regardless. I will further think about this, alas back to the wiring! | 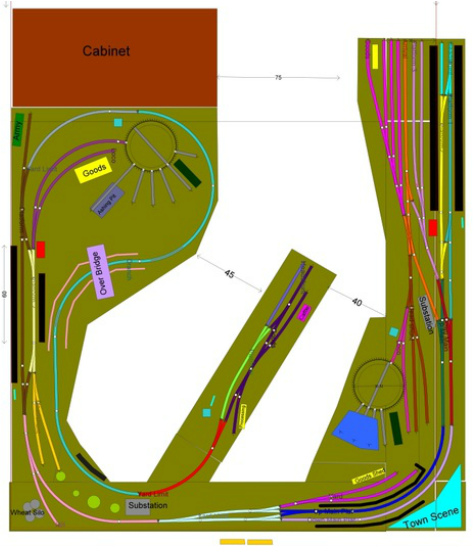 |
The Breakdown of sections by station.
Station 1:
1. Headshunt (light blue) - The headshunt will be a semi-rotary controlling either platform 1 headshunt or platform 2 headshunt or a neutral position to store a locomotive in both if need be (or if I get a railmotor self propelled in the future).
2. Platform 1 (dark blue) - A simple 3 position switch, position 1 local control, position two (neutral) is the off, and position 3 control from controller 2 (positioned at station 3).
3. Platform 2 (yellow) - 3 position switch.
4. Platform 3 (pink) - 3 position switch.
5. Arrival Road (orange) - 3 Position switch.
6. Goods (purple) - 2 Position switch, local control and off.
7. Goods Headshunt (brown) - 2 position Switch.
8. Loco (purple) - 2 position switch.
9. Turn Table - Semi-rotatary with the turn table itself always powered (or powered off loco, I have not yet decided).
10. Down main (dark red) - 3 position switch.
11. Up Main (green-ish) - 3 position switch.
Station 2 (I have 1 of two options at station 2):
Option 1: Have a local controller here and share with the branchline yard.
Pros - Easy reach for local control and shunting.
Cons - Cost (3 controllers and transformers as opposed to 2, estimating about $300 to $400 saving here).
Option 2: Share 1 controller between Stations 1 and 2 by running off the station 1 board.
Pros - Again Cost Saving, and simplified switches and running out of the main yard (i.e. no changing of control at station 2 meaning I can have run through goods and express trains).
Cons - Shunting at station 2 and overall control of station 2 would have to be from the station 1 board as running from the station 3 board would be impractical for shunting.
Either way Station 2 will have the following switches on either it's own board or Station 1's board (as I write this I lean toward option 2 for simplicity sake).
Station 2:
1. Down Platform (platform 2) (light pink) - 3 position switch.
2. Up Platform (platform 1) (dark blue) - 3 position switch.
3. Yard (purple) - 3 position switch.
4. Run Round (light green) - 3 position switch.
Station 3 (this control board will control both Station 3 and the branchline):
1. Hill (pink) - 3 position switch.
2. Platform 1 (brown) - 3 position switch.
3. Platform 2 (cream) - 3 position switch.
4. Up Yard (yellow) - 2 position switch.
5. Down Yard (purple) - 2 position switch.
6. Down Yard limit (grey) - 2 position switch (possibly a 3 position switch, depending on train lengths I run).
The Turntable will be controlled by a semi rotary switch similar to that of Station 1's board with the turntable itself constantly with power.
Branchline (controlled from Station 3's board and continuing from the above list):
7. Branchline (light blue) - 2 position switch.
8. Yard Limit (red) - 2 position switch.
9. Station (light green) - 2 position switch.
10. Headshunt (deep blue) - 2 position switch.
11. Goods (dark purple) - 2 position switch.
 RSS Feed
