 | At the time of Publishing this Blog I am at design 3.6 and I am having to recall my original designs and decisions. My initial design I called "Wye" and is a concept I wouldn't mind revisiting in the future. The concept of Wye (pronounced "why") was to restrict myself to a primary yard with two lines feeding the yard, one electrics and one line of non-electrics, and having to shunt to the accepted trains to continue the journey from line one to line two or vice versa. It was small, minimalist, I could run diesels, steam and electrics. I'd only have a small overhead wire section and would only need to invest in one electric locomotive. The problem was that Wye would take up a lot of room being such a small layout occupying such a large space. I wanted it to keep it in the 'Y' shape aswell, to show why the yard accepted from two different directions (the left and right forks of the 'Y'. This was all too hard in my, then, current residence on the coast. I shared with a flatmate, and our living spaces were adequate but too small for a layout. However prospects were about to change, there was much light on the horizon. Due to circumstances with my employment I moved to a more regional area which had far cheaper rent than that of the coast, meaning that for the same price as my previous |
accommodation I now gained a garage, 3rd bedroom, backyard, sheds and a front and back yard (and the accompanying responsibilities). Now I had a room to place the trains in rather than a nook, which lead to the deletion of the design dubbed "Wye". I am ever thankful to my girlfriend, who I moved in with, for allowing me to have a train room. This came with a few concessions on my part (that actually worked out in my favour) with the space in the room, but that doesn't come in until Design 2.0.
Design 1.0
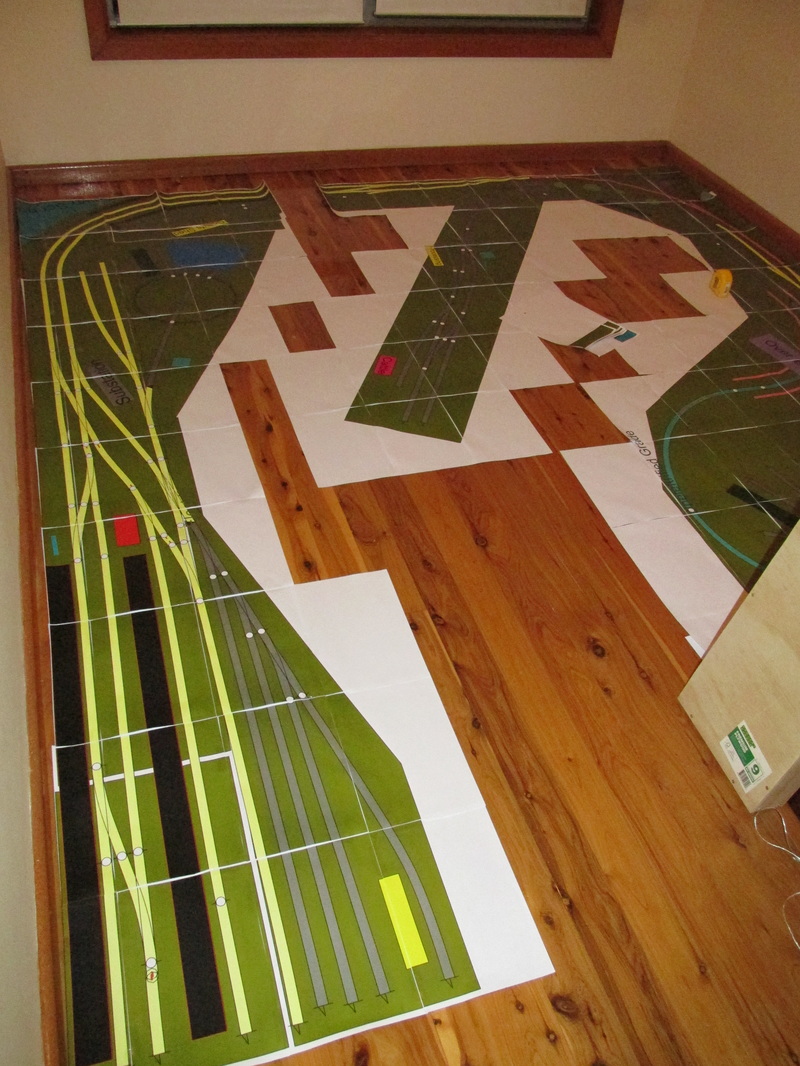
Still a few weeks until move in date and as I was some 5 hours away from the house I couldn't just pop in and take a few measurements. I therefore measured a few rooms during our inspection and as it wasn't yet decided which room was to be my small slice of heaven I had to make a few assumptions. I knew that both rooms were 2.6 metres wide, the variable was the length. One room had one metre less space due to a built in vanity. I therefore planned for the worst, ever hoping for the best. My dimensions were 2.6 x 2.6. I started making plans as per these dimension. With this information, my parameters were no longer unknown and I would start dabbling in what could actually become a reality.
To assist in the design process I downloaded AnyRail 5 Trial Version on the recommendation from my brother. AnyRail allows you to choose from a range of manufacturers of track and accessories. AnyRail also lets you to use any size track you wish (code 100, code 75, code 83) allowing you to accurately plan your layout. Further, you can have a radius limit on your curves to increase operational ability and design the layout optimally. I used a radius limit of 18" (That's 45.72cm for us of the metric world). Most new models coming out of factories have a minimum radius of 18". By changing the settings to Imperial, setting the minimum radius as 18" and then changing back to Metric, the Metric users can ensure they don't break these barriers if they choose to link two pieces of track freehand while still understanding the distances and measurements involved. Changing to Imperial and placing this setting and changing also negates the pesky rounding error of the 45.72cm.
To assist in the design process I downloaded AnyRail 5 Trial Version on the recommendation from my brother. AnyRail allows you to choose from a range of manufacturers of track and accessories. AnyRail also lets you to use any size track you wish (code 100, code 75, code 83) allowing you to accurately plan your layout. Further, you can have a radius limit on your curves to increase operational ability and design the layout optimally. I used a radius limit of 18" (That's 45.72cm for us of the metric world). Most new models coming out of factories have a minimum radius of 18". By changing the settings to Imperial, setting the minimum radius as 18" and then changing back to Metric, the Metric users can ensure they don't break these barriers if they choose to link two pieces of track freehand while still understanding the distances and measurements involved. Changing to Imperial and placing this setting and changing also negates the pesky rounding error of the 45.72cm.
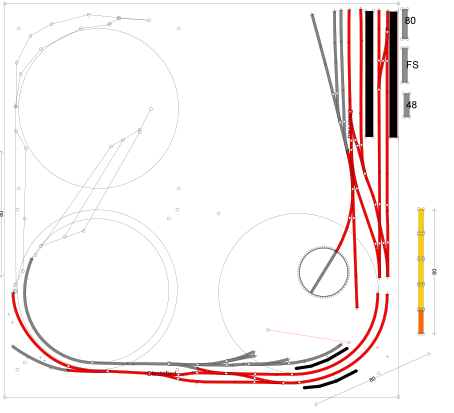 Design 1.5In the excitement Design 1.5 (Pictured Right) soon developed into a paperclip design wrapping around itself. I'll quickly explain the red track is the electrified track, and the grey is non-electrified. Station one stayed in the original design. I quiet liked this style of Yard, it has 3 platforms at the station and a good arrival/departure road for electric. The set up at station 1 also restricts shunting to non-electrified locomotives. I find this a nice operational constraint meaning that I'll always need to have a diesel or steam locomotive handy in the area, even I have to transfer it from another location. The head shunt is also electrified to allow the electrics to escape, as is the turntable and turntable road. | Now down to the Designs. Design 1.0 was a point to point design that went around the outside of the 2.6 by 2.6 square I had created myself. . I set myself some basic idea I wanted in a layout of this size; electrified double track, going down to single track, double track cross over, a bay platform amongst other ideas. I unfortunately ran out of pieces on AnyRail 5 Trial Version as it limits you to about 50 pieces. If you want to increase the number of pieces you have to buy AnyRail 5. For $60.00 (the cost of 2 Peco points, or $20.00 less than a double slip) I thought this was well worth it. I quickly got overly excited and saved over designs 1.1, 1.2, 1.3 and 1.4. Before I go any further I'll add that for reference I will be referring to stations (the black rectangles) as 1, 2, 3 and 4 starting from the top right (the main station) 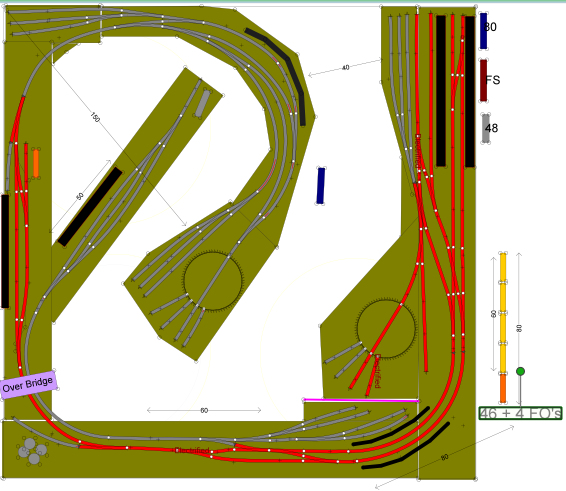 |
Station 2 consisted of a double track mainline platform and a bay platform, storage road for carriages and 2 goods sidings. The entry to the branchline from the main was via a crossover, however there was no access to the bay platform from the main. I don't know how in all honesty I missed this as a major flaw with this design, but there was so much happening at the time. As we leave 2 The double track continued to become single track where it passed a facing wheat silo and continued past an overbridge designed to be a scenery break as we pull into 3.
The idea of 3 was to be essentially an intermediate stop where the electrics come off the train and the non-electrics go on to continue on to 4. Short, and simple, 2 trains pass, and trade locomotives, or alternatively, locomotives are waiting for the express to continue on to 4.
Station 4 facilitates the turnaround of the train, and the final desitantion . To accommodate this function there is a small yard on the sliver of land that is the final stop. As you leave the station however the curve into the lower yard however breaches the 18" Radius rule. This was a problem that needed to be rectified only after I had decided on the concept I wanted here.
Lastly the branchline departing Station 2. The destination was supposed to be loosely based on the Oberon yard I grew up around. Oberon had 3 roads with the rear road being a goods siding, the front road being the platform and the middle road being the run round for both roads. However I quickly remembered that I had been given a small layout just prior to the arrival of a 49 class I had waited some years for. This soon became the branch line terminus and stayed as such for the remaining designs.
Design 1.8
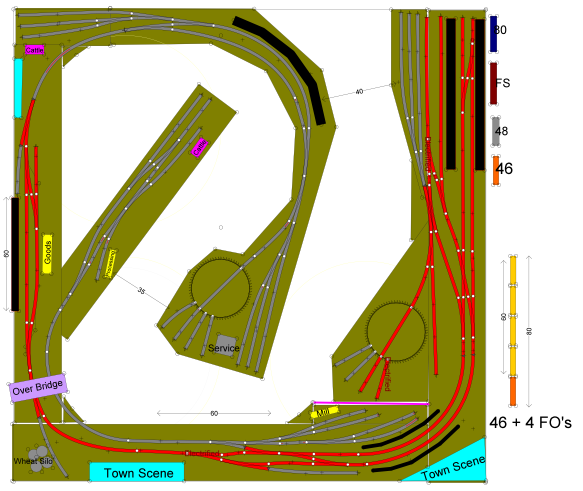 | The design changes to 1.6 were the branchline changes I described before. The design changes to 1.7 was a small fiddle around with the mess of crossovers and curves at station 4. Design 1.8 is where this design really took shape and reached its pinnacle. In This design, I thought I had it, I thought it was done! I turned the silo around by the suggestion of my brother, genius! I eased the curves on the branch line with the module I already had complete, outstanding! I even put a small wall between the loco depot at Station 1 and the yard at station 2! I added town scenes and everything. I then took stock. The gaps between tables were 40cm in some places. I am a thin and healthy young man, but a 40cm gap, in my place |
of relaxing was too narrow, especially in the entry way. But the layout had everything I wanted, double track, single track, electrified, unelectrified, a bay platform, a branch line... Hell, even an independent branch line that could feed back to Station 1! It still felt too compacted. Was there too much going on? Was this too ambitious? In theory it looked great, however I still had a tight curve through the run round at station 4.
I pondered, but there was no time as the move had begun, and my girlfriend and I moved in together for the first time. I now had to try to make my pitch for the room I wanted, competing against my girlfriend's pitch of a library (a library/guest room that my train books were banned from). In our first house, I had to not only sell the idea that my hobby gets a room to itself (something I had already done by requesting a 3 bedroom house or a 2 car garage), but now I had to further justify to a normal person, a non-enthusiast why the trains deserve a bigger room than the guests. To you and I, avid reader, the answer is all to obvious. The absolute magnificence of the railway room will justify without question why the trains get the biggest room. Apparently this doesn't sit well with the normal people, the non-enthusiasts. However this will have to wait until Design 2.0
I pondered, but there was no time as the move had begun, and my girlfriend and I moved in together for the first time. I now had to try to make my pitch for the room I wanted, competing against my girlfriend's pitch of a library (a library/guest room that my train books were banned from). In our first house, I had to not only sell the idea that my hobby gets a room to itself (something I had already done by requesting a 3 bedroom house or a 2 car garage), but now I had to further justify to a normal person, a non-enthusiast why the trains deserve a bigger room than the guests. To you and I, avid reader, the answer is all to obvious. The absolute magnificence of the railway room will justify without question why the trains get the biggest room. Apparently this doesn't sit well with the normal people, the non-enthusiasts. However this will have to wait until Design 2.0
 RSS Feed
