Right, back to the drawing board. There was too much happening on the layout before! Too many things going on! So my brother made a radical suggestion that I would not have previously considered. From station 2 onwards, redesign. He gave me a basic idea that would stay with me for the long run. At first I was apprehensive, but I put the design in and low and behold, I gained more space in the room!
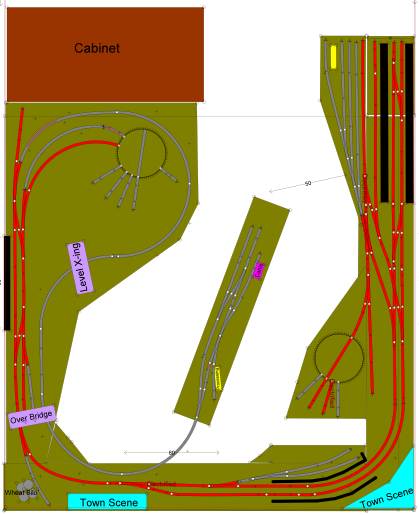 | With design 3.0 my electrification became easier, and my overall length increased. I was still apprehensive though. It didn't feel right. I had lost some sidings, a lot of sidings! I had some wasted space, and lots of it!I lost my run round at station 2! Station 3 was the terminus for electrification and the line continued onto the branchline from 3. I decided that the branchline would stay as a branchline, not a main line. This would restrict me and mean that the 36 class wasn't running some distance in reverse. This would restrict the branchline to my 49, 48 and 19 class, and all the main to be run by the 46's and the 36. I had left the bay platform at station 2 as a non'electrified siding, as this would be where the LFX would run to on a small goods to the branch, or to turn around at station 3 and return to Station 1 I went back to my deliverables, I had a run through station, a bay platform, a transition from electrified to non-electrified... But overall I had lost some sidings... I decided to tweak the design, it could be improved... |
| Design 3.1 I changed the colour of electrified track from red to yellow. This would allow me to see if any of my curves were breaching the 18" radius rule. And luckily they weren't! I did tweak the design however. Working from the branchline to Station 1, I eased the curve on entering the yard of the branchline, I added a small halt on one of the curves to break up the journey (I considered a passing loop here but quickly talked myself out of it, I didn't have enough traffic to warrant a passing loop at this halt... besides, the halt gave the branch character. At 3 I switched the electrified sided at the loco depot and added a platform 2 at station 3. Going around to 2 I added some trees to break up the scene from the electrified line and the branchline. Arriving at Station 2 I had installed a crossover and thus achieved my run round! I am still deciding whether or not to electrify the crossover, as electrics will rarely use it, however I feel it would be handy in case I forget to close the crossover so as I don't wreak the wire or pantographs. | 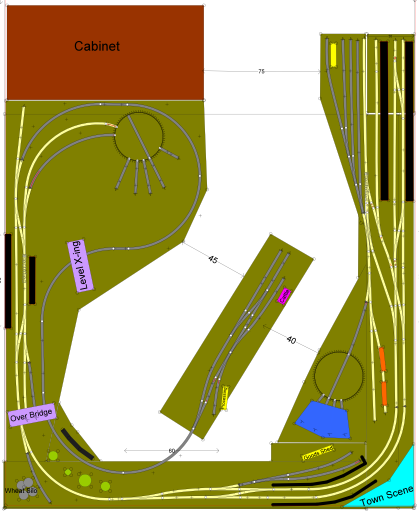 |
Coming around to 1, I decided that the 46 class would not live in the round hour with the rest of the locomotive, but in their own siding off the head shunt. This extension of the lower yard at Station 1 meant that I could ease the curve coming into the turntable at Station one, and this would link the base boards up (an idea I was no longer adverse to). All else stayed the same. I was quite happy with the long sweeping bends, but it was all too flat.... Why was the line electrified? Convenience? I've never know a government to spend a lot of money on convenience.... I decided that since I was originally modelling an extension of the Blue Mountains line, the reason would be so obvious! The terrain was hilly! Too easy! I took this Idea further.
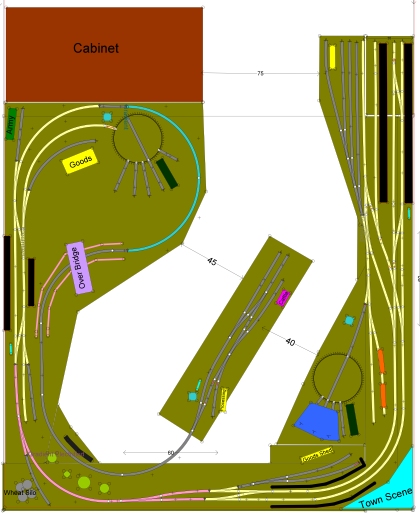 | In Design 3.2 I added a grade up to station 3. I decided that to further separate the line coming into Station 3 to the branchline I would raise the yard at Station 3 by about 2 or 3 centimeters and drop the branchline to the datum height of stations 1 and 2. This would then be achieved along the long sweeping curve of the branchline. I added a cutting to the branchline, changed the level crossing to an overbridge, and removed the old overbridge from the bottom corner. Further, I changed the electrified headshunt to an army siding (having recently bought some SDS models TE's) and removed the electrification in this siding. This would give further purpose to the 46's (I can't see that a 36 class would enjoy pulling 2 Centurion tanks up a grade from a standing start, on the other hand a 46 would have no problem!) I started the grade rising from Station 2 (Stations 1 and 2 would be at the aforementioned datum height) and then rising to 3 and lowering back down to the datum at end of the blue track, and continuing the journey at this height. Fantastic! The design is coming along well! I've even got a goods road back at station 3! Brilliant! |
Design 3.3
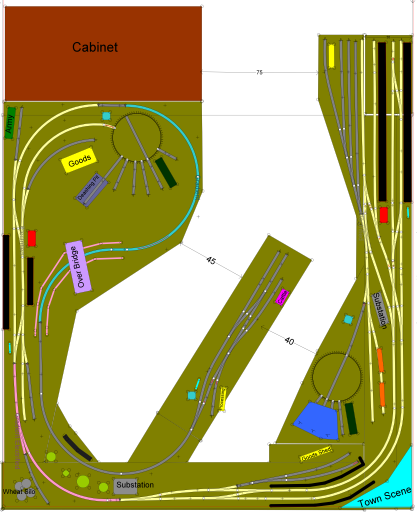 | 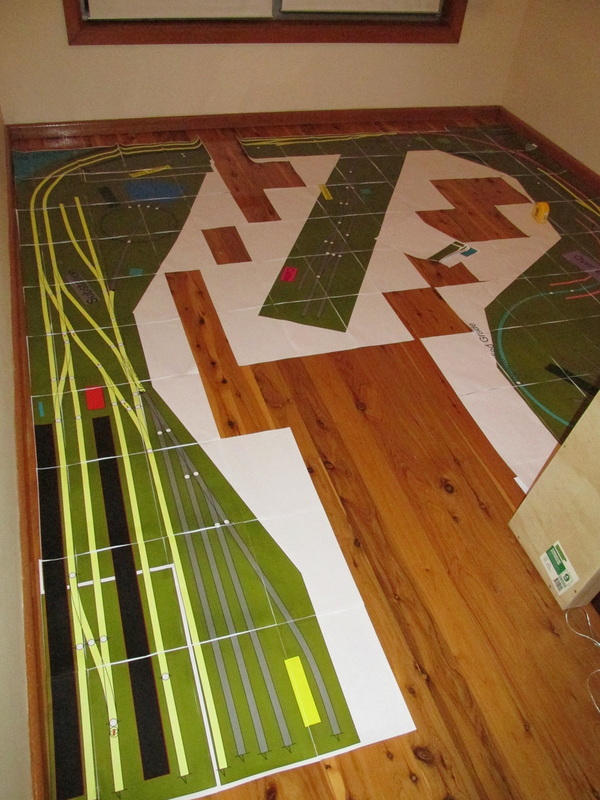 |
Design 3.3, was (up until recently) my final design. Just a few changes to design 3.2 to bring us to where we are now. I reduced the climb from Station 2 to Station 3. The height difference would be 2 centimetres. The fall from Station 3 to the branchline would now go 3 centimetres below the datum height and give depth to the cutting. Those were the few changes I made. At last, the job was done! It was complete! So I printed out the design and with the help of my very patient girlfriend we stuck the pieces of paper together folding the edges for a snug, accurate fit.
Once this was finished I couldn't believe my eyes, I thought there was a mistake! I had an extra 8cm along the base of the room, I actually had more space! Every modelers dream! Having more space than you thought you would or did! Back once more to the drawing board, not before taking a few careful measurements. Turns out the rounding I did back at design stage 1.0 came back to bite me.
So for one last time what did I change? We move on to Design 3.4
Design 3.4 - The Final Design
| So the measurements I'd taken, starting from the branchline; Nothing has changed here. To Station 3, turns out that I didn't have enough room to run round the suburban (4 car FOs) or the express (VHO + 2 x FS). So I extended the run round at the station 3. This shortened my grade, but the length in the grade was gained at the base with where I had gained 8cms of space. Going to station 2, apart from the space gained I noticed that I was l lacking adequate storage for my LFX at station 1. I thought to myself 'where could I store it?'. Noting that in the 60s the LFX was on its last legs and these wagons were used in stations by station masters and Ways & Works as storage. So I decided that if I extended the bay platform I could still run the CCA and 19 class into the station without coupling up to the LFX. | 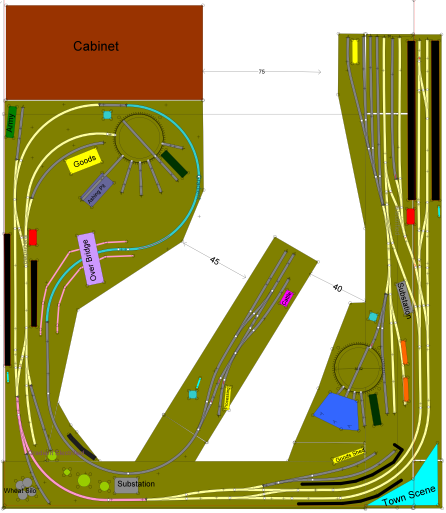 |
This would then also mean that with a longer bay platform I could use it as the departure road for a mixed passenger and goods comprising of 2 goods wagons, LFX and an LHG. This train would then be able to run to the branch, and operate as an independent line. This is what I wanted, great!
Back to the changes! Now at Station 1, I added a siding off platform 3 of station 1. This will be the storage road for the two FS's and the VHO. I plan to buy a carriage storage shed here. This train will be dubbed the 'express' and will depart from and arrive in Platform 3. I also added a siding near the turntable, this siding will be a Ways & Works siding.
With that, it's finished. The layout design is caught up to where the timeline now is. I have one last thing I would like to change, and I will continue to consider it, and make an update is it changes. At station 1 between platform 1 and 2 the crossover closest to the buffers, I'm thinking of changing this direction over to allow a locomotive coming off an entering suburban (from the up) entering into platform 1.
Thanks for reading. The Pen and Paper of the track design is now done. Next I will be looking at the design of the sections and sectors (being DC as opposed to DCC). Then the design for the portal frames for the overheads (I look forward to writing that blog post!). Also design of the towns, scenery and substations.
Until next time!
 RSS Feed
